Sunday, October 28, 2012

Herbs for Home Gardening


 gardeb pic resize

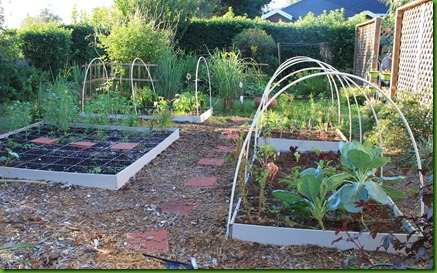
My garden this fall is productive and flourishing. I have learned and experienced so much during the 4 years I’ve been gardening. I now grow herbs, vegetables, and butterfly plants. Many of my herbs and vegetables are started from seed which allows me to experiment with different and unique varieties. When I first started, I could hardly get seeds to sprout and many of my plants dried out. So if you feel that you are lacking a “green thumb,” don’t be discouraged. Start out small and then expand. I learned that growing plants in pots in Florida doesn’t work well because the heat dries out the soil too fast. We converted to raised beds in our family garden which works much better.  Also, as a beginner gardener, I suggest buying seedlings from the store and when you feel more confident than begin your journey with seeds. Beware though, seed shopping is addicting!

The joy of herbs! So many choices.

amaranth

Starting herbs from seeds can open so many different opportunities to try new varieties. Old heirloom varieties are especially interesting and are fun to try. This heirloom amaranth is Joseph’s Coats “Perfecta and adds splashes of color to my garden.

amaranthamaranth drying

Red Hopi Dye Amaranth is a fun plant to grow. It’s leave and flower heads are a vibrant red and add color to the garden. The leaves make a great addition to salads. Collecting the seeds is another option, but it requires a lot of work. It gave me a great respect for pioneers who collected and thrashed their own grain! It requires drying out the seed heads, shaking out the thousands of seeds, and then separating the chaff from the seed. It was a fun activity to do with my dad, but I decided once is enough with this endeavor.

   cinnamon basilbasil

Herbs have so many different varieties and flavors to choose from. For example you can buy cinnamon basil, sweet basil, lemon, thai, licorice, lime, and the list goes on and on. The multitude of flavors can make cooking a pleasure.

tarragon

Tarragon is another great addition to the garden. It begins to bloom in august. I like to add tarragon to salad, soups, and chicken dishes. It is great in soups if you like strong flavors. Tarragon also makes a great companion plant for pest management.

IMG_7416

Rosemary is one of my favorite herbs. I throw it on pretty much anything. It’s aroma reminds me of Christmas trees. The bees enjoy pollinating the flowers when in bloom. For cooking, it can be used fresh or dried and goes best with Mediterranean dishes.

stevia

Stevia is an amazing plant that is 200x sweeter than sugar! I like to take the leaves and uses them as a sweeter in tea. To make a tea infusion, place herbs and stevia leaves in a jar. Then, poor hot water over the herbs and screw on lid. The lid keeps the medicinal volatile oils of the herb contained inside. When it is cool, you can poor the infusion into your cup and you have a homemade tea.

IMG_7386    

Some plants are not available at plant nurseries and must be started from seed. Yarrow is one of those plants, but is well worth the extra effort. It has medicinal value for use during fevers. It helps to open pores to release toxins, raise temperature, and increase over all circulation. It also has value as a biodynamic accumulator. That means that the plant gathers up nutrients from deep down in the soil and makes them available to other plants.

IMG_7392

This last herb is a unique plant that I had never heard of until getting the seeds. It is called the toothache plant and is rightly named. Yesterday, my gums and teeth hurt after eating. As soon as I got home, I rushed to my garden and washed off a few leaves. I chewed the leaves and then moved it to the area that was hurting. The leaf juices caused some numbing on my tongue and helped to relieve the toothache. That is one amazing plant! Herbs are incredible for culinary, medicinal, and decorative use.

Tuesday, October 16, 2012

How to Start Worm Compost Bin


This fall I am participating in a Permaculture Design Course through the Simple Living Institute http://www.simplelivinginstitute.org/. Tia and Terry Meer are teaching the course and have discussed a wide range of topics. For day 4, we discussed propagation from seeds and cuttings, composting piles, and worm composting. All of these are important in applying permaculture and integrating sustainable living. It is a way of life that takes time and is constantly developing.

Steps to Building Worm Bin

IMG_5190

The bottom container has a tap that allows worm compost tea to be released. The worm tea is very concentrated so I water mine down to a ratio of 1 part worm tea and 10 parts water. It is a wonderful liquid fertilizer for plants. I use it for plants that need a little extra boost in nutrients. Then I lay down a thin cloth before adding the first tray which will be where the worms and food scraps are added. At the bottom of the tray, I put ripped up paper. This is a great way to recycle junk mail and newspaper!

Buy worm bins and red wiggler worms at http://vermifactory.com/ 

IMG_5193

The next step is adding some soil and coconut coir that came with the kit our family bought at VermiFactory.com. Adding soil from the garden will add microorganisms that will assist in the breaking down process.

IMG_9918

And now the best part, add the worms and scraps from the kitchen. The video at the beginning of the entry discusses what to feed worms.

IMG_5229 

Next, top it off with more paper. Using a paper shredder is the best method, but shredding by hand will work as well. Finish it off by watering it in. The kit I have comes with three trays which can be stacked as needed. The worms multiply rapidly so the more food you add the more worms you will have. When a tray is almost ready to harvest, I put it at the very top so the worms start crawling to a lower bin in search of more food. I leave the lid off so the bin will dry out. When it is ready, you can harvest the worm compost and add it around plants.

Tuesday, October 2, 2012

Composting and Mushroom Permaculture Project


urban farm 

For the third day of the Permaculture Design Course, we spent the morning learning about composting, biointensive gardening, creating mushroom beds, and we began our study of forest garden designs. The Urban Farm is an educational site that brings fellow gardeners together to dig deeper into permaculture. The farm demonstrates how to produce food that is healthy for us and the planet. The Urban Farm is managed by Tia Meer and was co-founded with John Rife. The farm now has a work exchange CSA program and “Work and Learn” classes to teach basic gardening skills to anyone who is interested.

Urban Farm Website: http://winterparkharvestfestival.com/urban-farm 

IMG_7253

The first demonstration involved hands on work for building a compost pile. These wood pallets were converted into a composter. We discovered that the wood was already in use by a cluster of mushrooms.

IMG_7257

With all the men working together, the composter was quickly assembled.

IMG_7260 IMG_7261

The first layer consisted of larger material so that the pile will stay aerated. Everyone worked together to build up the pile. In Florida, palm branches are plentiful so they made a great contribution to the compost pile.

IMG_7268 

How to Build Your Own Mushroom Bed

IMG_7274

To make a mushroom bed, pick a moist, semi-shady spot. Prepare a rectangular frame of hardwood logs to surround the bed. Lay down a layer of cardboard from flattened boxes and water until saturated. Next, sprinkle spawn lightly over the cardboard in an evenly spread layer

mushroom

A closer look at mushroom mycelium.

IMG_7276

Add a 3 inch layer of compost and hardwood chips. Mix with sawdust spawn. Water again.

IMG_7282

Spread a second layer of mushroom spawn.

IMG_7295

Add another 3 inch layer of compost and water well. Top it off with a 1-2" layer of straw. Water daily for the first week, every other day for 2-4 weeks, and once a month after that. Now, you are on your way to a bed that will supply nutritious mushrooms protein, carbohydrates, and minerals. Happy composting/mushroom growing!